Thursday, May 19, 2011

User doesn`t see invitation from other`s:

Become A Game Tester, Highest Conversions In Niche, Highest Payout!

User doesn`t see invitation from other`s:

In Outlook go to Tools


Open DELEGATES ( last tab)


When he has somebody in delgates and the box with Send meeting requests and responses only to my delegates, not to me  is ticked, untick that and he will after that receive the invitation.


To share your Calendar

Become A Game Tester, Highest Conversions In Niche, Highest Payout!
To share your Calendar

Click on "Share My Calendar"


Click add and enter the name of the person you wish to be able to see your Calendar, giving them the correct rights.

To open a shared Calendar

Become A Game Tester, Highest Conversions In Niche, Highest Payout!
To open a shared Calendar

Click on the "Open Shared Calendar" link on the left hand side in screenshot above:


Enter group Calendar name and click ok.

Wednesday, May 18, 2011

Create distribution-lists in Outlook

Become A Game Tester, Highest Conversions In Niche, Highest Payout!

Steps to follow :


Follow these steps to create personally distribution-lists in contacts:

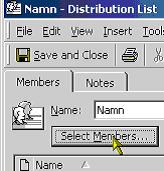
Click on: File -> New -> Distribution List.


Name the List


 To add persons that are in the Global Address-list (GAL) or in Contacts, click on Select Members and mark the name that you want to add to your list, then click the Add-button


When the list is finished, click Save and Close. The name of the list are now shown in the contact-folder in Outlook.

Create distribution-lists

Create archive in MS Outlook

Become A Game Tester, Highest Conversions In Niche, Highest Payout!

Solution:


·         Make sure Outlook is open .
·         Go To File , open , personal folder files


·         In the next window , just give a name to new pst file .


·         In the next window " creation of microsoft Personal folder file " just type in the same name that you already typed in the previous window .
·         User can create a password to protect his datas .


·         Click OK


Now you will see the folder diplayed in Outlook .


·         User can create subfolders to organise his Emails .( right click on the pst file , new folder )


Create a signature in outlook

Become A Game Tester, Highest Conversions In Niche, Highest Payout!

Steps:


From the Tools menu, select Options. 
Select the Mail Format tab and click the Signature Picker button. 
The Signature Picker dialog box is displayed


Click New.  The Create New Signature dialog box is displayed.


Type your name in the Name text box and click the Next button.  The Edit Signature dialog box is displayed.


 Type in your signature .
Click Finish.  The Signature Picker dialog box is displayed.
Click OK.
Click OK to close the Options dialog box.


Follow these steps    – to automatically insert an AutoSignature in all your messages
I.                     From the Tools menu, choose Options.  Click the Mail Format tab.
II.                   Select your new AutoSignature in the Use this Signature by default list box.
III.                  Check the Don’t use when replying or forwarding option if it is not already selected.
IV.               Click OK.
Identifying a sender without an AutoSignature
If you receive a message from someone who does not use AutoSignature, you can still find address information for that person.
Follow these steps    – to find address information for a sender
I.                     Open the message.
II.                   Right-click the sender’s name in the From area and select Properties on the shortcut menu.
Note that there is more information under the tabs.  Click the Business Card tab for example, if you want more information
I.                     Click OK to close the dialog box.